
How to Use RenoAI: Step-by-Step Guide for Interior & Space Design
Designing spaces no longer requires complex tools or long turnaround times. With RenoAI, you can transform real-world spaces into stunning design concepts within seconds using simple image uploads.

This guide walks you through every feature inside RenoAI from interior design to master planning so you can confidently create, edit, and visualize spaces like a professional.
Whether you’re a designer, architect, or beginner, this blog will help you understand exactly how to use RenoAI step by step.
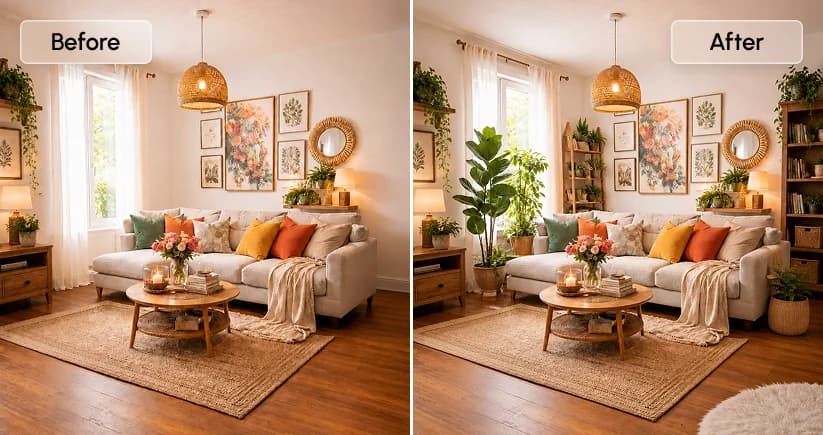
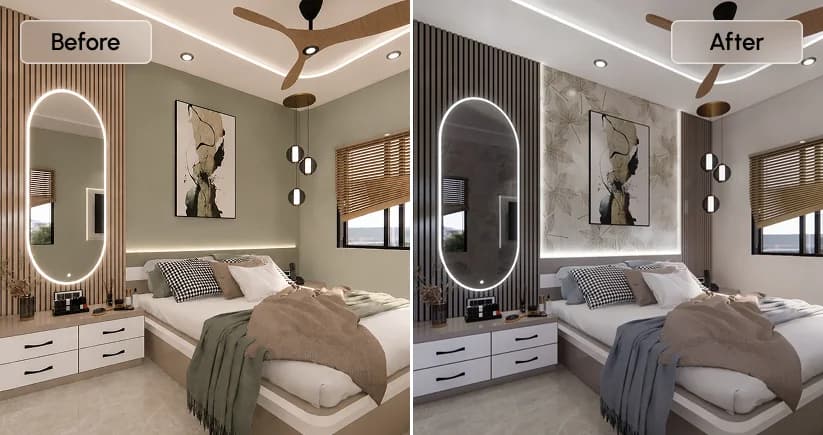
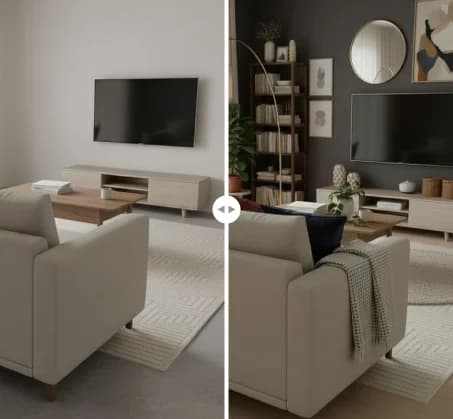
Interior Design Feature in RenoAI
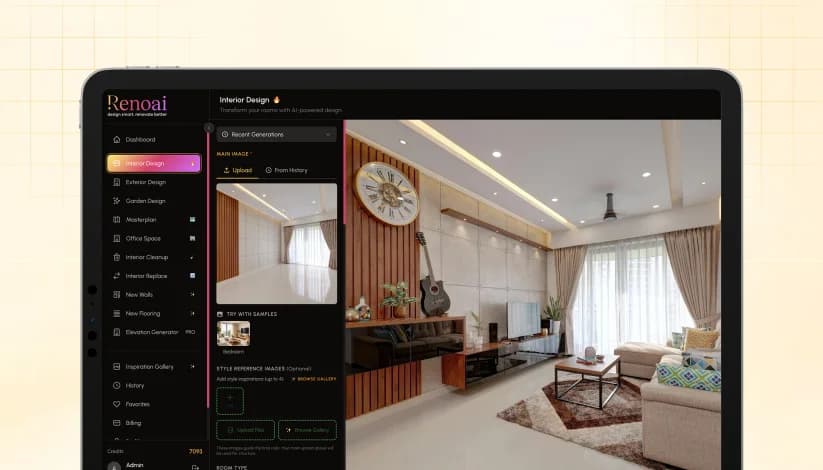
The Interior Design section is where you turn a real space into multiple design concepts using a single image. The flow is simple, but the quality of output depends on how you set each input. Here’s how to use it properly, step by step.
1. Start by Uploading Your Space
Begin by uploading a reference image of the room you want to redesign. You can either upload a new image, pick one from your history, or use saved assets.
Use a clear, well-lit image that captures the full layout of the room. The better the input, the more accurate the output.
If you’re just exploring, you can also start with RenoAI’s sample images to understand how the tool behaves.
2. Define the Type of Room
Once the image is uploaded, select the room type. This is one of the most critical steps because it tells the AI how to interpret the space.
For example-
- A family room will prioritize comfort and casual seating
- A media room will focus on screens, acoustics, and lighting
- A formal living room will lean toward structured layouts and elegant decor
RenoAI supports a wide range of spaces beyond living rooms, including bedrooms, kitchens, offices, entertainment zones, and even specialized areas like home theaters or meditation rooms.
Selecting the correct room type ensures the layout, furniture placement, and design logic align with real-world expectations.
3. Choose the Design Style
Next, define the visual direction of the space by selecting a style.
You can choose from styles like modern, minimalist, Scandinavian, luxury, industrial, or more expressive themes like bohemian or art deco.
This step controls the overall look of the output, including materials, furniture language, and visual tone. It’s best to stay focused on one clear style instead of mixing multiple directions.
4. Set the Color and Aesthetic Direction
You can either define a color palette or let the system generate one automatically.
This influences wall colors, textures, furniture tones, and overall mood. If you’re working on a client project, keeping the palette aligned with their preferences or brand is important.
There is also an option to add style reference images, which helps the AI match a specific aesthetic more closely. This is useful when you already have a mood board or inspiration.
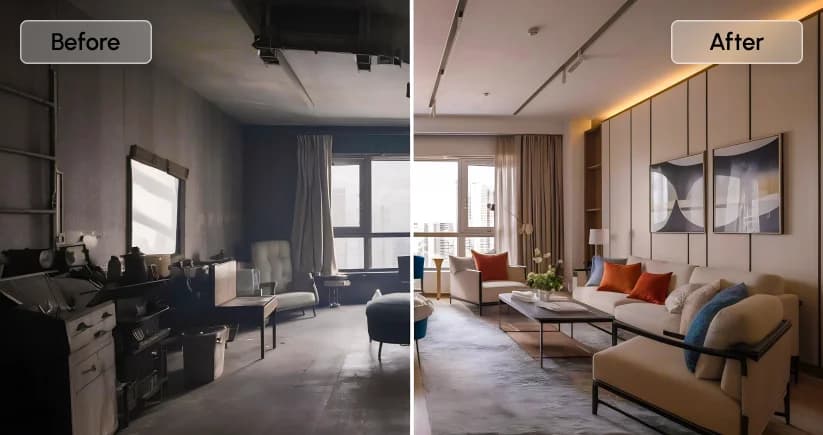
5. Control How Much the Space Changes
RenoAI allows you to control the level of transformation using the renovation spectrum.
- Minimal settings keep most of the original structure intact
- Mid-level settings enhance and refine the space
- Higher levels completely transform the design
This is useful depending on your goal. If you want a realistic upgrade, keep changes subtle. If you’re exploring bold concepts, allow more transformation.
6. Adjust Environment and Output Style
You can further refine the output by selecting lighting conditions such as daylight, dusk, or indoor night settings. This changes the mood and realism of the design.
Then choose how you want the output to look-
- Realistic for client-ready visuals
- CGI for polished renders
- Sketch or illustration for conceptual work
These settings don’t change the layout, but they significantly affect presentation.
7. Control Creativity vs Accuracy
RenoAI lets you decide how strictly the AI should follow your inputs.
A more precise setting keeps the output close to your original structure and selections. A more creative setting allows the AI to experiment with layouts and elements.
Choose based on whether you’re finalizing a concept or exploring ideas.
8. Finalize Output Settings and Generate
Before generating, select the aspect ratio based on where you’ll use the design: social media, presentations, or vertical formats.
You can also add a custom prompt if you want to guide the AI further with specific instructions.
Once everything is set, generate the design. RenoAI will produce multiple variations based on your inputs.
9. Review and Iterate
After generation, review the outputs and compare variations.
If something feels off, adjust-
- Room type
- Style
- Transformation level
- Reference inputs
RenoAI works best as an iterative tool. Small changes in input can lead to significantly improved results.
What This Section Enables?
The Interior Design feature is not just about visualizing a room. It helps you-
- Explore multiple design directions quickly
- Communicate ideas visually to clients
- Test layouts before execution
- Reduce dependency on manual concept creation
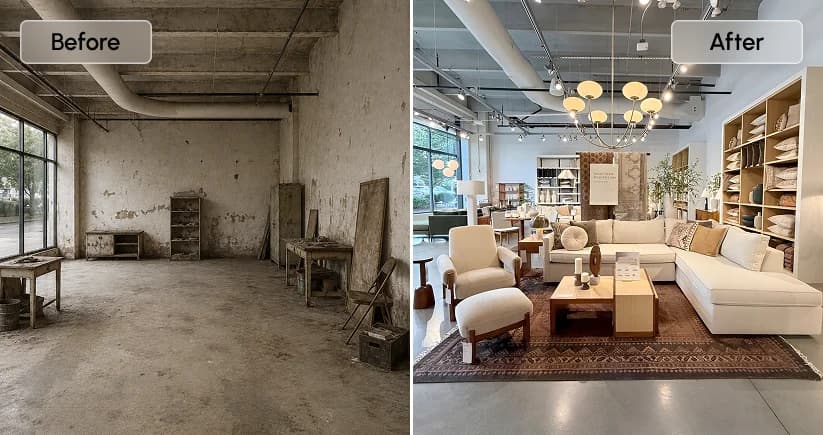
Exterior Design Feature in RenoAI - Designing Building Facades and Outdoor Spaces
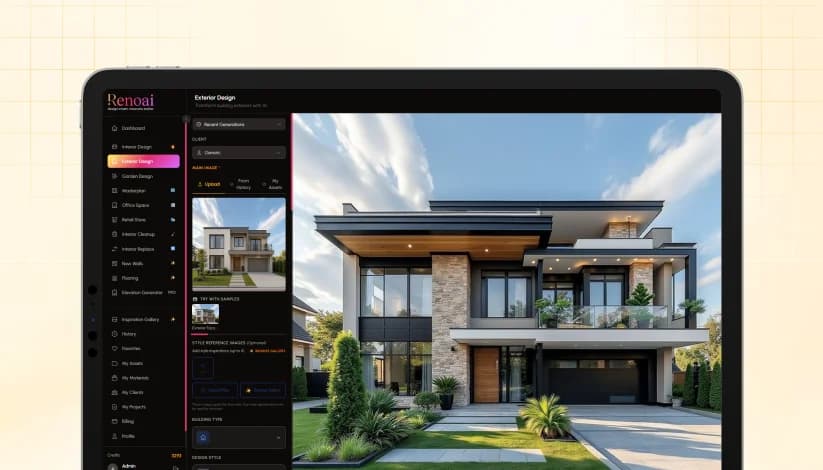
The Exterior Design feature in RenoAI allows you to transform the outer appearance of any building or structure using AI. Unlike interior design, this section focuses on façades, surroundings, and environmental context making it ideal for architects, real estate teams, and developers working on visualizing exteriors before execution.
Here’s how the entire flow works in a step-by-step manner.
1. Upload the Exterior Image
Start by uploading the image of the building or structure you want to redesign.
You can-
- Upload a new image
- Select from history
- Use saved assets
The image should clearly show the façade or external structure. Angles, lighting, and visibility of architectural elements directly impact the output quality.
If you’re new, you can begin with sample exterior images to understand how RenoAI generates results.
2. Add Style References (Optional but Impactful)
You can upload up to four reference images to guide the design direction. These references help the AI understand-
- Material preferences
- Architectural style
- Design mood
This is especially useful when working with client briefs, brand guidelines, or inspiration boards.
3. Define the Building Type
This is one of the most critical inputs in exterior design. RenoAI allows you to choose from a wide range of building categories such as-
- Residential buildings
- Commercial buildings
- Educational institutions
- Industrial spaces
- Healthcare facilities
- Hospitality structures
- Public and government buildings
- Religious and transportation infrastructure
You can also select specific environments like yards, ranches, or swimming pool areas.
Selecting the correct building type ensures the AI aligns the façade design with real-world architectural logic, scale, and purpose.
4. Choose the Exterior Design Style
Next, define how the building should look visually.
You can select from styles like-
- Modern, minimalist, luxury
- Mediterranean, colonial, Victorian
- Industrial, high-tech, parametric
- Coastal, tropical, rustic
- Commercial storefronts or flagship designs
This step controls materials, geometry, façade treatments, and architectural detailing.
5. Set Color Palette and Regional Influence
You can either define a color palette or allow RenoAI to generate one.
There is also an option to add regional luxury influence, which helps tailor the design to specific geographic aesthetics. If not needed, you can keep it universal.
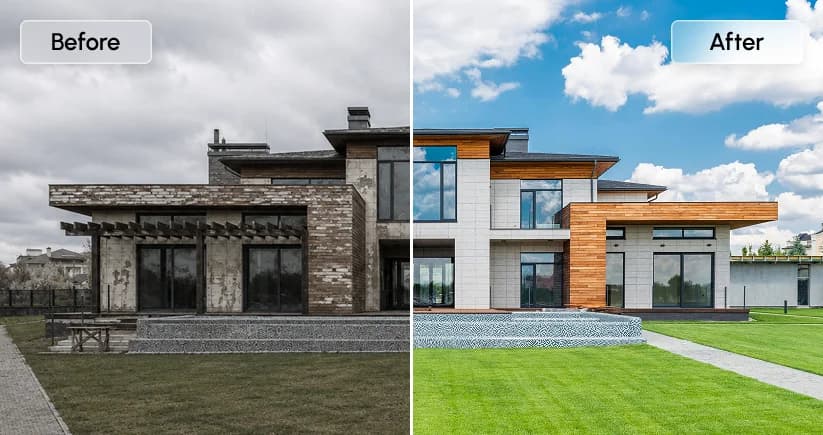
6. Control the Level of Transformation
Using the renovation spectrum, you decide how much the original structure changes-
- Minimal changes retain most of the original façade
- Moderate changes refine and upgrade the design
- High transformation creates entirely new exterior concepts
This flexibility is useful when comparing renovation vs redevelopment ideas.
7. Define Input Type and Structure Understanding
Specify the type of image you uploaded-
- Real photo
- Drawing or elevation
- 3D massing model
- Wireframe or construction stage
This helps RenoAI interpret depth, geometry, and structure more accurately.
8. Add Scene Context Elements
This is where exterior design becomes more realistic and presentation-ready. You can enhance the scene by adding-
- Vehicles for scale
- Greenery for landscaping
- Water features for aesthetics
- People for liveliness
- Pathways for movement
- Urban elements for context
These elements don’t just decorate the output they help visualize how the building fits into a real environment.
9. Define Environment and Surroundings
RenoAI allows you to simulate real-world conditions by selecting-
Time of Day:
- Morning, afternoon, evening, or night
Weather Conditions
- Sunny, cloudy, rainy, foggy, or stormy
Season
- Spring, summer, autumn, or winter
Environment Type
- Urban, suburban, rural, coastal, or mountainous
This is particularly useful for presentations, marketing visuals, or contextual storytelling.
10. Adjust Lighting and Output Style
You can further refine the mood using lighting presets such as daylight, dusk, or overcast conditions.
Then choose how the final output should appear-
- Realistic for client-ready visuals
- CGI for architectural presentations
- Sketch or illustration for early concepts
11. Control Creativity and Final Output
Set how closely the AI should follow your inputs-
- More precise for structured outputs
- More creative for exploratory concepts
You can also define-
- Aspect ratio based on usage (presentation, social media, etc.)
- Output quality depending on detail requirements
12. Generate and Refine
Once everything is set, generate the design.
Review the outputs and iterate by adjusting-
- Building type
- Style
- Context elements
- Transformation level
Exterior design works best when refined in cycles, especially for professional use cases.
What This Feature Enables?
The Exterior Design feature helps you-
- Visualize façade transformations before construction
- Present multiple architectural concepts quickly
- Add real-world context to building designs
- Explore renovation vs redevelopment scenarios
Garden Design Feature in RenoAI - Creating AI-Powered Outdoor Landscapes
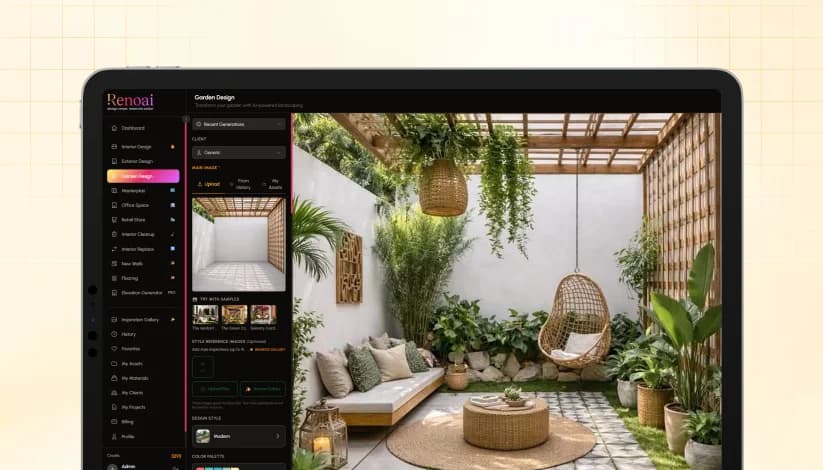
The Garden Design feature in RenoAI is built to help you visualize and redesign outdoor spaces such as backyards, courtyards, patios, and landscaped areas. It follows a similar flow to interior and exterior design, but with deeper control over materials, greenery, and outdoor elements.
Here’s how to use it effectively.
1. Upload Your Garden or Outdoor Space
Start by uploading an image of the outdoor area you want to design. This could be a backyard, terrace garden, courtyard, or open land. You can upload a new image, reuse one from history, or select from saved assets.
For best results, use images that clearly show the ground layout, boundaries, and existing elements.
If you’re exploring, RenoAI provides sample garden scenes like courtyard or landscaped spaces to get started quickly.
2. Add Style References for Direction
You can upload up to four reference images to guide the design outcome. This helps define-
- Landscaping style
- Plant density and layout
- Material combinations
It is especially useful when you have a specific vision, such as a modern lawn, zen garden, or tropical outdoor space.
3. Choose the Design Style
Select a design style to define the overall look of the garden.
Options like modern, minimal, zen, or lush green styles influence how plants, pathways, and structures are arranged. This step sets the visual tone for the entire space.
4. Define Color and Visual Mood
You can either set a color palette or let RenoAI generate one automatically.
In garden design, this affects-
- Plant tones and foliage density
- Ground materials and textures
- Overall vibrancy of the space
5. Control the Level of Transformation
Using the renovation spectrum, you can decide how much the space changes.
Options include-
- Lower levels preserve the existing layout with small improvements
- Medium levels enhance and reorganize elements
- Higher levels completely redesign the landscape
This is useful when comparing light landscaping upgrades versus full garden transformations.
6. Customize Materials in Detail
This is where the Garden Design feature becomes more powerful than other sections.
You can define specific materials for different elements such as-
- Paving and driveways
- Fences and gates
- Decks, patios, and pergolas
- Planters and edging
- Outdoor furniture and seating
- Water features and lighting
You can either select from existing options or upload your own material references. This gives you precise control over how the garden is constructed visually.
7. Define Input Type for Accuracy
Specify whether your image is a real photo, drawing, 3D model, or construction-stage image.
This helps RenoAI understand depth, scale, and structure, which is critical for outdoor layouts.
8. Add Context Elements to Enhance Realism
You can enrich the scene by adding contextual elements such as-
- Greenery and landscaping layers
- Water features like ponds or fountains
- People for scale and usage
- Pathways and movement areas
These elements help the design feel more complete and realistic rather than isolated.
9. Set Environment and Conditions
You can simulate real-world outdoor conditions by selecting-
- Time of day (morning, afternoon, evening, night)
- Weather (sunny, cloudy, rainy, foggy)
- Season (spring, summer, autumn, winter)
- Environment type (urban, suburban, rural, coastal, mountain)
This is especially useful for presentations, as it shows how the garden looks in different scenarios.
10. Adjust Lighting and Output Style
Choose lighting conditions such as daylight, dusk, or overcast to define the mood.
Then select how the output should be presented-
- Realistic for client-ready visuals
- CGI for conceptual presentations
- Sketch or illustration for early-stage ideas
11. Finalize Settings and Generate
Before generating, you can-
- Adjust creativity level depending on how experimental you want the output
- Select aspect ratio based on usage
- Add a custom prompt for specific instructions
Once done, generate the design and review multiple variations.
12. Iterate for Better Results
Garden design often improves with small refinements.
You can tweak-
- Materials
- Style
- Transformation level
- Environmental settings
This helps you move from a rough concept to a polished outdoor design.
What This Feature Enables?
The Garden Design feature allows you to-
- Visualize landscaping ideas instantly
- Experiment with layouts, materials, and greenery
- Present outdoor concepts with realistic context
- Plan upgrades before actual execution
Masterplan Feature in RenoAI - Creating Complete Site and Urban Layout Visualizations
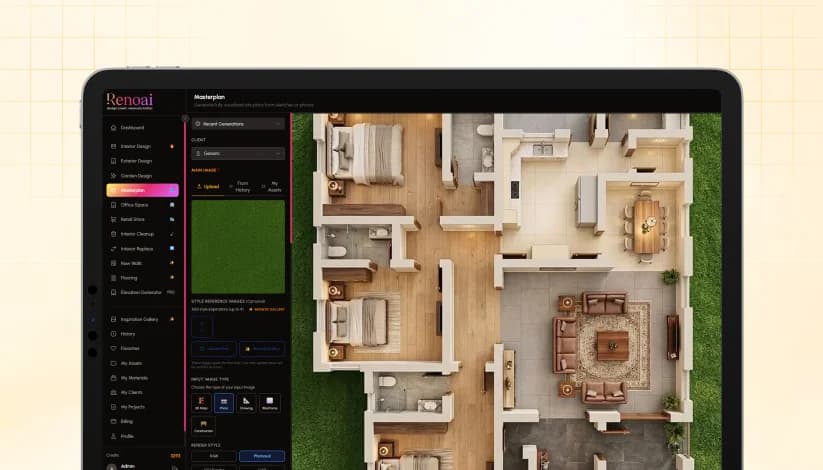
The Masterplan feature in RenoAI is designed for large-scale planning. Instead of focusing on a single room or building, this section helps you generate complete site layouts including multiple structures, roads, greenery, and surrounding context from a sketch, drawing, or aerial image.
It is especially useful for architects, planners, and developers working on township layouts, campuses, or mixed-use developments.
Here’s how the flow works.
1. Upload Your Base Layout or Reference
Start by uploading the base input. This can be-
- A rough sketch
- A site plan drawing
- A 3D massing model
- An aerial or real-world image
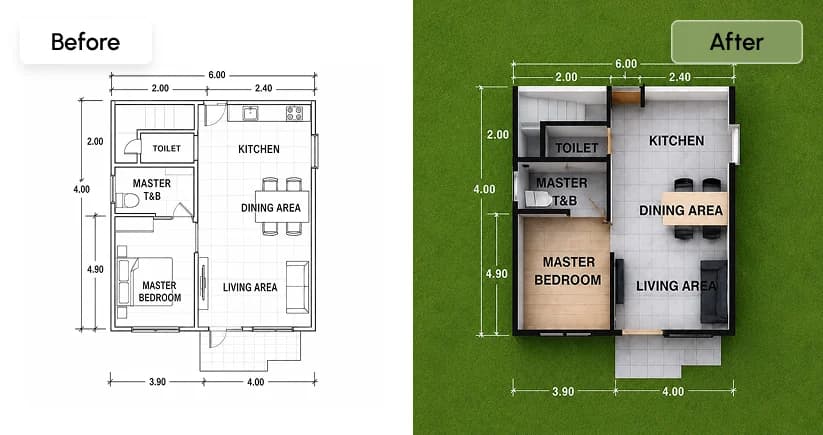
The Masterplan feature is flexible in terms of input, but clarity matters. Even a simple sketch can be converted into a structured visual plan if the layout is readable.
2. Add Style References (Optional)
You can upload reference images to guide the visual output.
These references help define-
- Architectural consistency across buildings
- Landscape treatment
- Overall planning style
This step is useful when aligning with a specific project vision or presentation requirement.
3. Define the Input Image Type
Select the type of file you uploaded: photo, drawing, wireframe, or 3D mass.
This ensures RenoAI correctly interprets-
- Layout structure
- Building placements
- Spatial relationships
Incorrect selection here can lead to misaligned outputs, so this step should match your input accurately.
4. Choose Render Style and Plan Mode
You can decide how the masterplan should be visualized.
Render Style options include-
- Photoreal for presentation-ready visuals
- CGI render for polished architectural output
- CAD or diagram for technical clarity
- Illustration or watercolor for conceptual storytelling
Plan Mode-
- 2D for flat layout understanding
- 3D for depth and spatial visualization
This combination defines whether your output is conceptual, technical, or presentation-focused.
5. Set Geometry and Camera Angle
You can control how strictly the AI follows your layout-
- Precise keeps the structure close to your input
- Creative allows reinterpretation of the layout
Camera angles such as aerial or oblique views help present the masterplan more effectively, especially for large-scale developments.
6. Configure Masterplan Settings
This is the core of the feature, where you define how the site behaves as a real environment.
Urban Density
- Controls how densely buildings are placed
Development Type
- Residential, commercial, mixed-use, industrial, or institutional
Water Features
- Add elements like lakes, rivers, or fountains
Greenery
- Define landscape density from sparse to lush
Vehicles and People
- Add activity levels to simulate real-world usage
These settings help convert a basic layout into a realistic, functional environment.
7. Define Environment and Conditions
You can adjust how the site appears under different conditions-
- Time of day (day, dusk, night)
- Weather (clear, cloudy, overcast)
This is useful for showcasing how the development looks in different scenarios, especially for presentations.
8. Add Annotations (Optional)
You can enable annotations to include-
- Labels
- Callouts
- Section markers
This is particularly helpful for-
- Client presentations
- Investor decks
- Planning documentation
9. Finalize Output Settings
Before generating, select-
- Aspect ratio based on usage
- Output quality
- Optional custom prompt for specific instructions
These settings refine how the final output is structured and presented.
10. Generate and Refine
Once everything is configured, generate the masterplan.
Review the output and refine by adjusting-
- Density and development type
- Greenery and water features
- Camera angle and rendering style
Master planning is typically iterative, and small adjustments can significantly improve clarity and realism.
What This Feature Enables?
The Masterplan feature allows you to-
- Convert rough layouts into structured visual plans
- Visualize large-scale developments quickly
- Add real-world context to planning concepts
- Present site designs clearly to stakeholders
Office Space Design Feature in RenoAI - Designing Functional Workspaces with AI
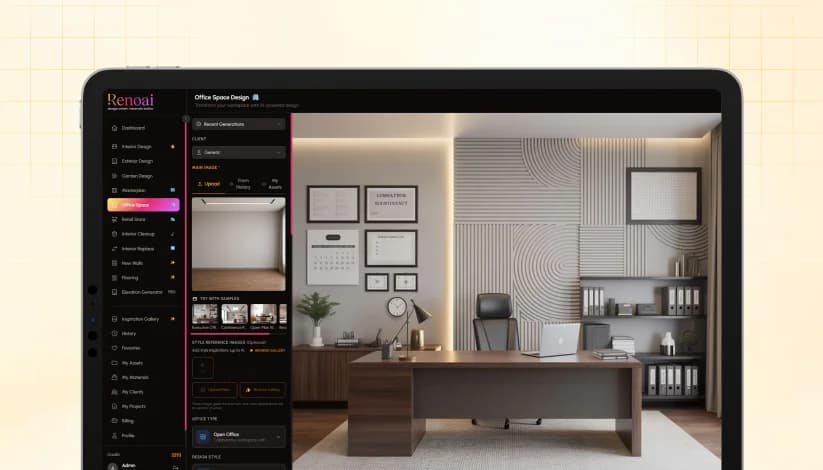
The Office Space Design feature in RenoAI is built to help you visualize and redesign professional environments such as offices, meeting rooms, and collaborative workspaces. Unlike residential design, this section focuses on functionality, workflow efficiency, and structured layouts suited for business environments.
Here’s how to use it effectively.
1. Upload Your Workspace Image
Start by uploading an image of the office or workspace you want to redesign. This could be an empty office, an existing setup, or even a layout reference.
You can upload a new image, select from history, or use saved assets.Clear images with visible layout, furniture, and spacing help generate more accurate results.
You can also begin with sample spaces like executive offices or conference rooms to understand how outputs are generated.
2. Add Style References (Optional)
You can upload reference images to guide the design direction.
This helps define-
- Workspace aesthetics
- Furniture style
- Layout preferences
This step is useful when aligning with brand identity, corporate themes, or client expectations.
3. Select the Office Type
This is the most important step in office design because it defines how the space will function.
RenoAI provides a wide range of office categories such as-
- Open office for collaborative environments
- Private or leadership offices for focused work
- Conference and meeting rooms for discussions
- Reception areas for front-facing interactions
It also supports specialized environments like-
- Law offices, consulting firms, and banking offices
- IT and tech offices, design studios, and production spaces
- Healthcare, government, and institutional offices
- Call centers, logistics offices, and research facilities
Choosing the correct office type ensures the layout aligns with real-world usage, including seating, spacing, and movement flow.
4. Define the Design Style
Select a style that reflects the brand and purpose of the workspace.
You can choose from modern, minimalist, corporate, creative studio styles, or more premium executive looks. This affects furniture design, color tones, and overall ambiance.
5. Set Color and Brand Alignment
You can define a color palette or let RenoAI generate one.
For office spaces, this is important because it directly impacts-
- Brand identity
- Employee experience
- Visual consistency across spaces
6. Control the Level of Transformation
Using the renovation spectrum, decide how much the space should change.
- Lower levels refine the existing setup
- Medium levels reorganize layout and improve functionality
- Higher levels completely redesign the workspace
This helps when comparing upgrades versus full office redesigns.
7. Define Input Type for Accuracy
Select the type of image you uploaded: photo, drawing, or conceptual model.
This ensures RenoAI correctly understands spatial structure and generates appropriate layouts.
8. Adjust Lighting and Output Style
Choose lighting conditions such as daylight or indoor ambiance to match the intended workspace environment.
Then select how the output should be presented-
- Realistic for client presentations
- CGI for polished visualizations
- Sketch or illustration for conceptual stages
9. Control Creativity and Output Settings
You can decide how closely the AI follows your inputs.
- A precise setting maintains structure and layout
- A creative setting explores new configurations
You can also adjust aspect ratio depending on how you plan to use the output.
10. Generate and Refine
Once everything is configured, generate the design.
Review the outputs and refine by adjusting-
- Office type
- Style and layout direction
- Transformation level
Office design often requires iteration to balance aesthetics with functionality.

What This Feature Enables?
The Office Space Design feature helps you-
- Visualize workspace layouts quickly
- Align design with business function and brand identity
- Explore multiple office configurations
- Present professional environments clearly to stakeholders
Retail Store Design Feature in RenoAI - Designing Customer-Centric Retail Spaces
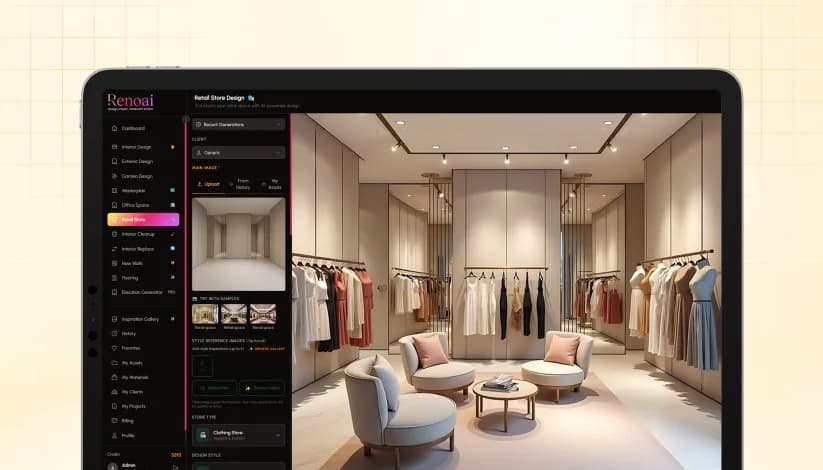
The Retail Store Design feature in RenoAI is built to help you visualize and redesign commercial retail environments. Unlike residential or office spaces, this section focuses on customer flow, product display, and brand experience, making it ideal for store owners, retail designers, and visual merchandisers.
Here’s how the flow works.
1. Upload Your Retail Space
Start by uploading an image of your store or retail area. This could be an empty space, an existing store, or a layout under development.
You can upload a new image, select from history, or use saved assets. The image should clearly show the floor layout, display areas, and entry points to ensure accurate design outputs.
If you are exploring, you can begin with sample retail spaces to understand how RenoAI structures layouts.
2. Add Style References for Brand Direction
You can upload up to four reference images to guide the design.
This helps define-
- Store aesthetics
- Display style
- Visual merchandising approach
This step is particularly useful when working with brand guidelines or creating a consistent retail identity across locations.
3. Select the Store Type
This is the most critical step in retail design because it defines how the space will function commercially.
RenoAI provides a wide range of store categories such as-
- Clothing and fashion stores
- Footwear and sportswear outlets
- Electronics and technology stores
- Food and beverage spaces
- Beauty, health, and personal care stores
- Jewellery, lifestyle, and specialty retail
It also supports larger formats like department stores and service-based retail setups.
Choosing the correct store type ensures the AI aligns layouts with real-world retail logic, including shelving, display zones, customer movement, and billing areas.
4. Define the Design Style
Select a design style that reflects your brand positioning.
Options include modern, minimalist, luxury, industrial, bohemian, and more expressive styles like futuristic or thematic environments.
This step controls how products are displayed, how space is structured, and how the store feels to customers.
5. Set Color Palette and Regional Influence
You can define a color palette or let RenoAI generate one.
For retail spaces, color plays a major role in-
- Brand recall
- Customer behavior
- Product visibility
You can also apply regional luxury influences if you want the store to reflect a specific geographic aesthetic. Otherwise, it can remain universal.
6. Control the Level of Transformation
Using the renovation spectrum, you decide how much the store changes.
- Lower levels refine the existing layout
- Mid-level changes improve display and flow
- Higher levels completely redesign the store
This is useful when testing store upgrades versus full redesign concepts.
7. Define Input Type for Accuracy
Select whether your image is a real photo, drawing, or conceptual model.
This helps RenoAI interpret spatial layout, depth, and structure correctly, which is essential for retail environments.
8. Adjust Lighting and Output Style
Lighting plays a key role in retail design.
You can choose different lighting conditions to simulate store ambiance. Then select how the output should be presented-
- Realistic for client or stakeholder presentations
- CGI for polished retail concepts
- Sketch or illustration for early-stage ideas
9. Control Creativity and Output Settings
You can define how strictly the AI should follow your inputs.
- Precise keeps layouts structured and realistic
- Creative allows exploration of new display concepts
You can also adjust aspect ratio based on usage, such as presentations or social media.
10. Generate and Refine
Once all inputs are set, generate the design.
Review the outputs and refine by adjusting-
- Store type
- Style and layout direction
- Transformation level
Retail design often benefits from iteration, especially when optimizing customer flow and product visibility.
What This Feature Enables?
The Retail Store Design feature helps you-
- Visualize store layouts before execution
- Improve product display and customer experience
- Align store design with brand identity
- Explore multiple retail concepts quickly
Interior Cleanup Feature in RenoAI - Removing Unwanted Objects from a Space
The Interior Cleanup feature in RenoAI is designed for quick visual refinement. Instead of redesigning a space, this tool allows you to remove unwanted objects from a room image while keeping the rest of the scene intact.
It is particularly useful for decluttering visuals before design, presentations, or marketing use.
1. Upload the Room Image
Start by uploading the image of the room you want to clean.
You can upload a new image, select from history, or use saved assets. The image should clearly show the objects you want to remove.
This feature works best with real photos where objects are easily identifiable within the scene.
2. Select Objects to Remove
Once the image is uploaded, you can directly interact with it.
Click on the objects you want to remove from the room. These could include-
- Furniture
- Decorative items
- Clutter or unwanted elements
RenoAI identifies the selected areas and prepares them for removal while maintaining the surrounding structure.
3. Adjust Output Settings
Before processing, you can define-
- Aspect ratio depending on how you plan to use the image
- Output quality based on the level of detail required
These settings ensure the cleaned image fits your intended format.
4. Process the Cleanup
Once selections are made, run the cleanup process.
RenoAI removes the selected objects and intelligently fills the space to maintain visual consistency with the rest of the room.
5. Review and Refine
After processing, review the output carefully.
If needed, you can repeat the process to remove additional elements or improve the result. This is especially useful when preparing a space for further design steps.
What This Feature Enables?
The Interior Cleanup feature helps you-
- Remove clutter from room images instantly
- Prepare clean base images for redesign
- Improve visuals for presentations or listings
- Save time compared to manual editing tools
Interior Replace Feature in RenoAI- Swapping Furniture with AI
The Interior Replace feature in RenoAI allows you to replace existing objects or furniture within a room without redesigning the entire space. Instead of starting from scratch, you can selectively upgrade elements like sofas, tables, or décor while keeping the rest of the room unchanged.
This is especially useful for quick redesigns, staging concepts, or testing furniture variations.
1. Upload the Room Image
Begin by uploading the image of the room where you want to replace furniture. You can upload a new image, select from history, or use saved assets.
The image should clearly show the objects you intend to modify, with enough visibility around them for accurate replacement.
2. Select the Object to Replace
Once the image is loaded, you can interact directly with it.
Click on the furniture or object you want to replace. This could include-
- Sofas
- Chairs
- Tables
- Beds
- Decorative elements
RenoAI identifies the selected object and isolates it for replacement while preserving the surrounding layout.
3. Define the Replacement Type
Choose how you want the replacement to be interpreted.
The photo-based option ensures the new object blends naturally into the existing environment, maintaining lighting, shadows, and proportions.
4. Describe the Replacement
This is where you guide the AI.
Provide a clear description of the furniture you want to replace it with. For example-
- Style (modern, minimal, luxury)
- Color (navy blue, beige, wood finish)
- Material (leather, fabric, metal)
- Design details (legs, shape, size)
The more specific your description, the more accurate the result.
5. Adjust Output Settings
Before generating, you can define-
- Aspect ratio based on usage
- Output quality depending on detail requirements
These settings ensure the final image fits your intended format.
6. Generate the Replacement
Run the replacement process.
RenoAI removes the selected object and inserts the new one based on your description, ensuring it aligns with the room’s perspective, lighting, and scale.
7. Review and Refine
After generation, review the output carefully.
If the result is not aligned with your expectation, you can refine-
- The object selection
- The description
- The style direction
Small changes in the description often lead to significantly better results.
What This Feature Enables?
The Interior Replace feature helps you-
- Test different furniture options instantly
- Upgrade specific elements without redesigning the entire room
- Create staging concepts for clients or listings
- Visualize design changes with minimal effort
New Walls Feature in RenoAI- Redesigning Wall Surfaces and Finishes
The New Walls feature in RenoAI is focused on one specific element of a space—walls. Instead of redesigning the entire room, this tool allows you to experiment with different wall finishes, colors, and textures while keeping the rest of the environment unchanged.
It is particularly useful for interior upgrades, quick visual changes, and material exploration.
1. Upload the Room Image
Start by uploading the image of the space where you want to modify the walls.
You can upload a new image, select from history, or use saved assets. The image should clearly show the wall surfaces so the AI can accurately detect and apply changes.
2. Add Style References (Optional)
You can upload reference images to guide the wall design.
This helps define-
- Finish type
- Texture style
- Overall aesthetic direction
This step is useful when you have a specific look in mind or want to match an existing design theme.
3. Select Wall Surface Type
Choose the base material or finish for the wall.
Options include-
- Paint for smooth matte, satin, or gloss finishes
- Wallpaper for patterned or textured surfaces
- Textured finishes for depth and variation
- Exposed brick or natural stone for raw or premium looks
- Wood paneling or concrete for modern or industrial styles
This selection defines the structural appearance of the wall.
4. Customize the Wall Style
Once the surface type is selected, you can personalize the design further.
You can-
- Choose a specific color
- Adjust texture
- Apply predefined style presets
Preset options include styles like Scandinavian white, earthy tones, moody dark finishes, botanical greens, or monochrome palettes.
These presets simplify the process by combining color and texture into ready-to-use design directions.
5. Add Custom Description (Optional)
If presets are not enough, you can describe your wall design.
You can specify-
- Exact color tones
- Texture details
- Accent elements
This gives you more control over the final output and helps tailor the wall design to specific requirements.
6. Adjust Environment and Lighting
You can define lighting conditions such as daylight, dusk, or night.
This helps visualize how the wall finish looks under different lighting scenarios, which is important for materials like paint, stone, or textured surfaces.
7. Finalize Output Settings
Before generating, select-
- Aspect ratio based on where the image will be used
- Output quality depending on the level of detail required
These settings ensure the final output aligns with your usage needs.
8. Generate and Review
Once everything is set, generate the design.
RenoAI updates only the wall surfaces while maintaining the rest of the room unchanged. This allows you to compare different finishes quickly.
You can iterate by changing-
- Surface type
- Color or preset
- Custom description
What This Feature Enables?
The New Walls feature helps you-
- Experiment with wall finishes without redesigning the entire space
- Compare multiple material and color options quickly
- Visualize upgrades before execution
- Create presentation-ready wall concepts
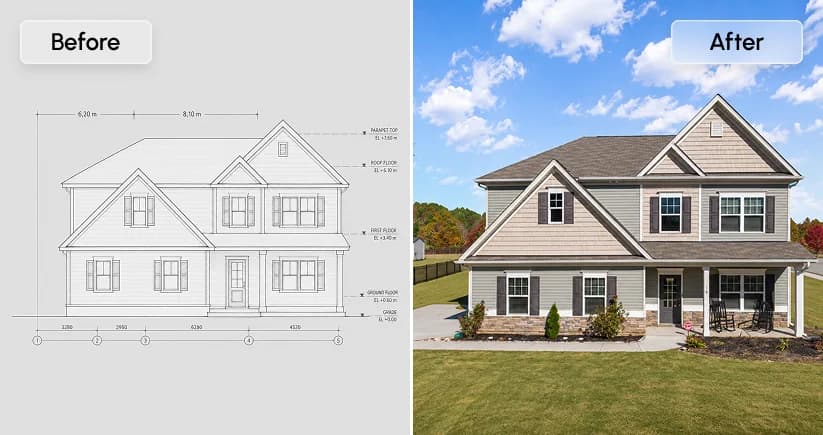
Elevation Generator Feature in RenoAI - Creating Architectural Elevations with Precision
The Elevation Generator in RenoAI is a specialized feature designed for creating building façade elevations with a higher level of control and detail. Unlike standard exterior design, this tool is built for more structured architectural outputs, making it suitable for professionals working on elevations, façade concepts, and presentation visuals.
1. Choose Your Configuration Mode
When you enter the Elevation Generator, the first decision is how much control you want.
- Simple Mode offers a quick setup with a few essential options, ideal for fast iterations
- Advanced Mode provides extensive control with a large number of parameters for detailed customization
If you are exploring concepts, Simple Mode is sufficient. For precise architectural outputs, Advanced Mode is more suitable.
2. Select How You Want to Start
You can begin in two different ways depending on your requirement.
Upload Reference Image
Use this when you already have a building or structure and want to enhance or redesign its elevation. This approach maintains the base structure while improving the façade.
Generate from Scratch
Use this when you want to create a completely new elevation design without any reference. The AI builds the design based entirely on your inputs and selected parameters.
3. Define the Design Direction
Once the starting point is selected, you can control how the elevation is developed.
The tool allows you to influence-
- Architectural style
- Material finishes
- Structural detailing
- Overall façade composition
This ensures the output aligns with either a conceptual idea or a real-world project requirement.
4. Customize Key Design Elements
The Elevation Generator provides deeper control compared to other features.
You can configure elements such as-
- Material selection for walls and façade surfaces
- Lighting conditions to define how the elevation appears
- Landscape context around the building
- Camera perspective for presentation
These controls help you move beyond basic visualization and create more refined architectural outputs.
5. Control Output and Presentation
You can adjust how the final elevation is presented based on your use case.
This includes-
- Choosing visual style (realistic, conceptual, or presentation-focused)
- Adjusting camera angles for better viewing
- Setting overall composition and framing
These settings are important when preparing visuals for clients, approvals, or marketing.
6. Generate and Refine
Once all inputs are defined, generate the elevation.
Review the output and refine by adjusting-
- Style and material choices
- Level of detail
- Structural elements or proportions
Elevation design often requires iteration to achieve the desired architectural balance.
What This Feature Enables?
The Elevation Generator helps you-
- Create professional façade designs quickly
- Convert existing buildings into refined elevations
- Generate new architectural concepts from scratch
- Control design details more precisely than standard tools
Conclusion: From Ideas to Visual Reality with RenoAI
RenoAI simplifies what was once a complex and time-consuming design process into a fast, intuitive workflow.
Whether you are redesigning a single room, planning an outdoor space, visualizing a retail store, or creating large-scale masterplans, each feature is built to give you control without overwhelming complexity.
By combining real images with guided inputs, RenoAI helps you move from rough ideas to clear, visual concepts that are easier to evaluate, refine, and present. The more you experiment with its features, the more powerful and precise your results become.
See RenoAI Come to Life in Your Space
Upload your room image and preview bold geometry, rich finishes, and timeless elegance before making any design decisions.
Preview RenoAI Now
Frequently
Asked Questions
Have questions about How to Use RenoAI: Step-by-Step Guide for Interior & Space Design? We answer them here
No, RenoAI is simple for beginners and professionals. Upload an image, choose settings, select a style, and generate design ideas quickly.
Start Designing with RenoAI for Free
Get 50 free credits to create up to 2 AI-generated design images in just 30 seconds.
No credit card required. No long setup. Just upload your space and start visualizing instantly.
- 50 Free Credits
- Generate up to 2 images
- No credit card required
- Unlimited design exploration
- Higher usage, faster workflow
- Built for serious design needs

Turn Any Space into a Designed Concept in Minutes
Upload your space. Define your style. Let AI do the rest.
Try RenoAI Now
